
Prerequisites and Assumptions
Here’s an outline of what I’m assuming about you and what you already know, as well as what software you’ll need ready and installed on your computer.
Python 3 and Programming
I’ve tried to write this book with beginners in mind, but if you’re new to programming, I’m assuming that you’ve already learned the basics of Python. So if you haven’t already, do run through a Python beginner’s tutorial or get an introductory book like The Quick Python Book or Think Python, or, just for fun, Invent Your Own Computer Games with Python, all of which are excellent introductions.
If you’re an experienced programmer but new to Python, you should get along just fine. Python is joyously simple to understand.
You should be able to follow this book on Mac, Windows, or Linux. Detailed installation instructions for each OS follow.
This book was tested against Python 3.12.
If you’re on an earlier version, you will find minor differences
in the way things look in my command output listings
(tracebacks won’t have the ^^^^^^ carets marking error locations for example)
so you’re best off upgrading, ideally, if you can.
|
If you are thinking of using PythonAnywhere rather than a locally installed Python, you should go and take a quick look at [appendix1] before you get started.
In any case, I expect you to have access to Python, to know how to launch it from a command line, and to know how to edit a Python file and run it. Again, have a look at the three books I recommended previously if you’re in any doubt.
How HTML Works
I’m also assuming you have a basic grasp of how the web works—what HTML is, what a POST request is, and so on. If you’re not sure about those, you’ll need to find a basic HTML tutorial; there are a few at http://www.webplatform.org/. If you can figure out how to create an HTML page on your PC and look at it in your browser, and understand what a form is and how it might work, then you’re probably OK.
Django
The book uses the Django framework, which is (probably) the most well-established web framework in the Python world. I’ve written the book assuming that the reader has no prior knowledge of Django, but if you’re new to Python and new to web development and new to testing, you may occasionally find that there’s just one too many topics and sets of concepts to try and take on board. If that’s the case, I recommend taking a break from the book, and taking a look at a Django tutorial. DjangoGirls is the best, most beginner-friendly tutorial I know of. The official tutorial is also excellent for more experienced programmers.
JavaScript
There’s a little bit of JavaScript in the second half of the book. If you don’t know JavaScript, don’t worry about it until then, and if you find yourself a little confused, I’ll recommend a couple of guides at that point.
Read on for installation instructions.
Required Software Installations
Aside from Python, you’ll need:
- The Firefox web browser
-
Selenium can actually drive any of the major browsers, but I chose Firefox because it’s the least in hock to corporate interests.
- The Git version control system
-
This is available for any platform, at http://git-scm.com/. On Windows, it comes with the Bash command line, which is needed for the book. See Windows Notes.
- A virtualenv with Python 3.12, Django 4.2, and Selenium 4 in it
-
Python’s virtualenv and pip tools now come bundled with Python (they didn’t always used to, so this is a big hooray). Detailed instructions for preparing your virtualenv follow.
Windows users can sometimes feel a little neglected in the open source world, since MacOS and Linux are so prevalent, making it easy to forget there’s a world outside the Unix paradigm. Backslashes as directory separators? Drive letters? What? Still, it is absolutely possible to follow along with this book on Windows. Here are a few tips:
-
When you install Git for Windows, it will include "Git Bash". Use this as your main command prompt throughout the book, and you’ll get all the useful GNU command-line tools like
ls,touch, andgrep, plus forward-slash directory separators. -
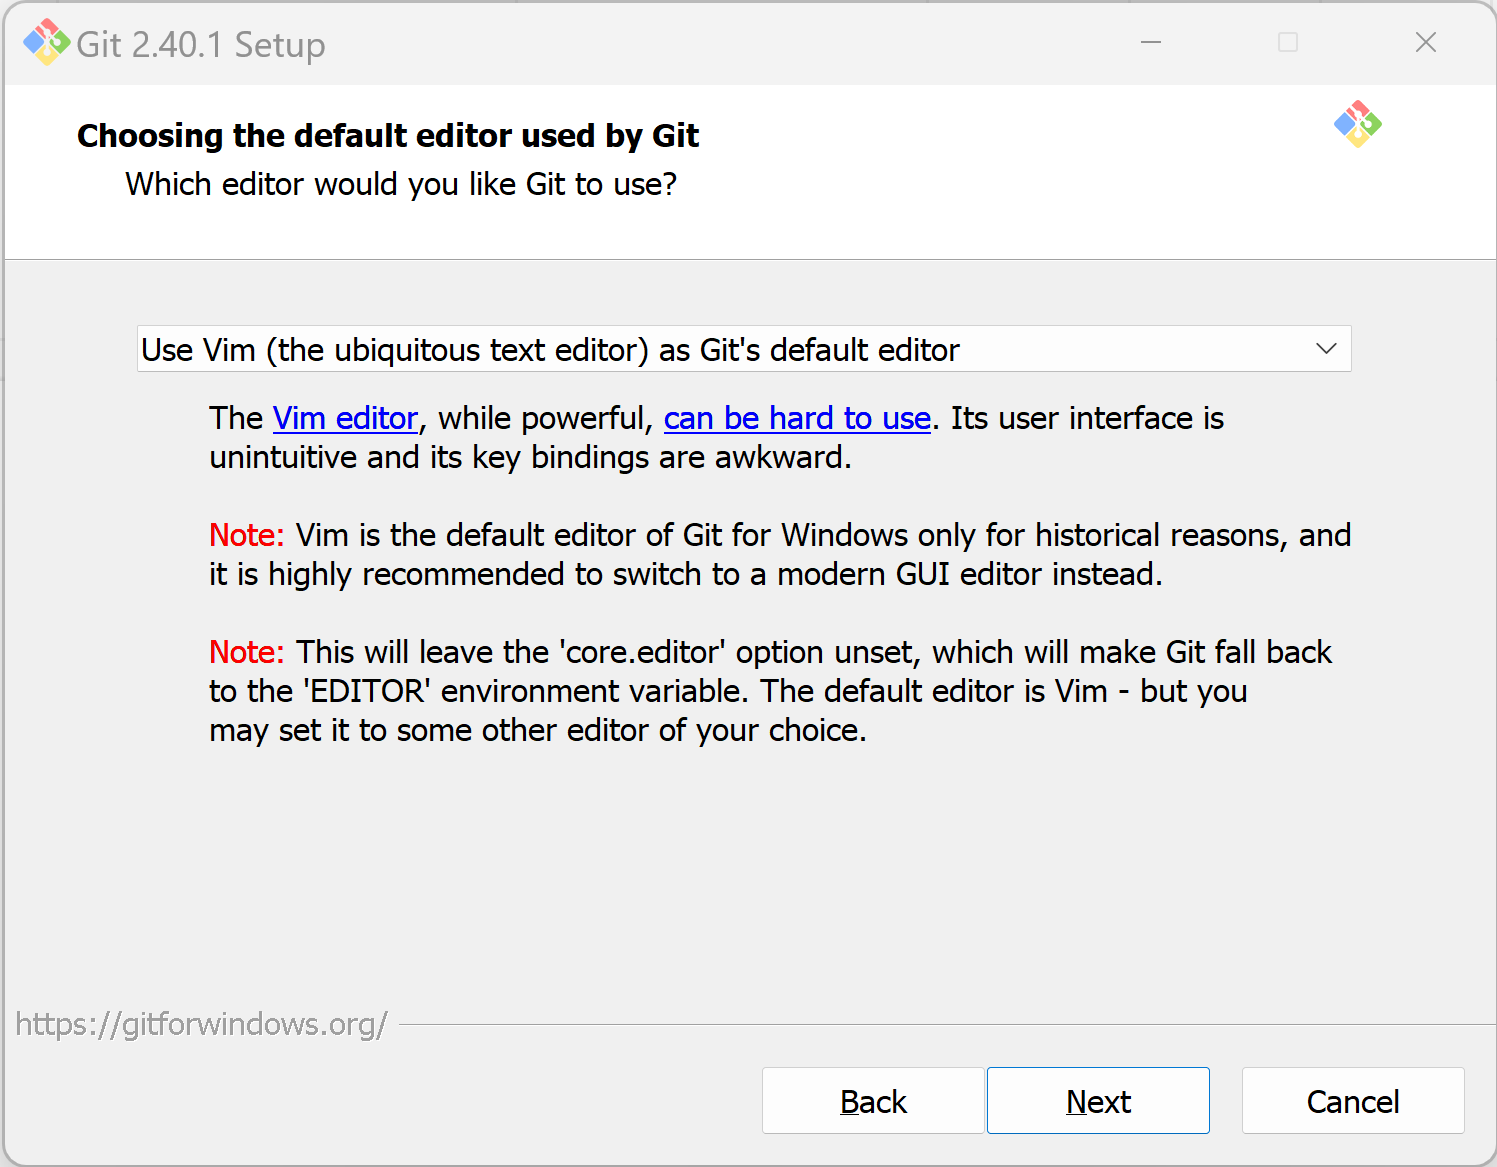
During the Git installation, you’ll get the option to choose the default editor used by Git. Unless you’re already a Vim user (or are desperate to learn), I’d suggest using a more familiar editor, even just Notepad! See Choose a nice default editor for Git.
-
Also in the Git installer, choose "Use Windows' default console"; otherwise, Python won’t work properly in the Git-Bash window.
-
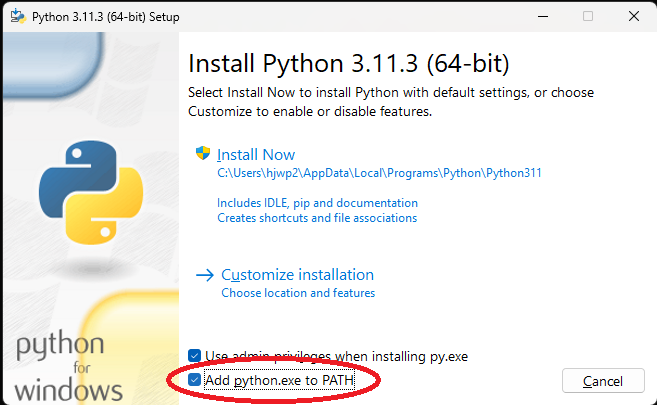
When you install Python, tick the option that says "Add python.exe to PATH" as in Add Python to the system path from the installer, so that you can easily run Python from the command line.
The test for all this is that you should be able to go to a Git-Bash command prompt
and just run python or pip from any folder.
Installing Firefox
Firefox is available as a download for Windows and MacOS from https://www.mozilla.org/firefox/. On Linux, you probably already have it installed, but otherwise your package manager will have it.
Make sure you have the latest version, so that the "geckodriver" browser automation module is available.
Setting Up Your Virtualenv
A Python virtualenv (short for virtual environment) is how you set up your environment for different Python projects. It allows you to use different packages (e.g., different versions of Django, and even different versions of Python) in each project. And because you’re not installing things system-wide, it means you don’t need root permissions.
Let’s create a virtualenv. I’m assuming you’re working in a folder called goat-book, but you can name your work folder whatever you like. Stick to the name ".venv" for the virtualenv, though.
$ cd goat-book
$ py -3.12 -m venv .venv
On Windows, the py executable is a shortcut for different Python versions. On
Mac or Linux, we use python3.12:
$ cd goat-book
$ python3.12 -m venv .venv
Activating and Deactivating the Virtualenv
Whenever you’re working through the book,
you’ll want to make sure your virtualenv has been "activated".
You can always tell when your virtualenv is active
because you’ll see (.venv) in parentheses, in your prompt.
But you can also check by running which python
to check whether Python is currently the system-installed one, or the virtualenv one.
The command to activate the virtualenv is source .venv/Scripts/activate on Windows
and source .venv/bin/activate on Mac/Linux.
The command to deactivate is just deactivate.
Try it out like this:
$ source .venv/Scripts/activate
(.venv)$
(.venv)$ which python
/C/Users/harry/goat-book/.venv/Scripts/python
(.venv)$ deactivate
$
$ which python
/c/Users/harry/AppData/Local/Programs/Python/Python312-32/python
$ source .venv/bin/activate
(.venv)$
(.venv)$ which python
/home/myusername/goat-book/.venv/bin/python
(.venv)$ deactivate
$
$ which python
/usr/bin/python
Always make sure your virtualenv is active when working on the book. Look
out for the (.venv) in your prompt, or run which python to check.
|
Installing Django and Selenium
We’ll install Django 4.2 and the latest Selenium[2]. Remember to make sure your virtualenv is active first!
(.venv) $ pip install "django<4.3" "selenium"
Collecting django<4.3
Downloading Django-4.2.7-py3-none-any.whl (8.0 MB)
---------------------------------------- 8.1/8.1 MB 7.6 MB/s eta 0:00:00
Collecting selenium
Downloading selenium-4.15.0-py3-none-any.whl (6.5 MB)
---------------------------------------- 6.5/6.5 MB 6.3 MB/s eta 0:00:00
Installing collected packages: django, selenium
Successfully installed [...] django-4.2.7 [...] selenium-4.15.0 [...]
Checking it works:
(.venv) $ python -c "from selenium import webdriver; webdriver.Firefox()"
this should pop open a Firefox web browser, which you’ll then need to close.
If you see an error, you’ll need to debug it before you go further.
On Linux/Ubuntu, I ran into this bug
which you need to fix by setting an environment variable called TMPDIR.
|
Some Error Messages You’re Likely to See When You Inevitably Fail to Activate Your Virtualenv
If you’re new to virtualenvs—or even if you’re not, to be honest—at some point you’re guaranteed to forget to activate it, and then you’ll be staring at an error message. Happens to me all the time. Here are some of the things to look out for:
ModuleNotFoundError: No module named 'selenium'
Or:
ImportError: No module named django.core.management
As always, look out for that (.venv) in your command prompt, and a
quick source .venv/Scripts/activate or source
.venv/bin/activate is probably what you need to get it working again.
Here’s a couple more, for good measure:
bash: .venv/Scripts/activate: No such file or directory
This means you’re not currently in the right directory for working on the
project. Try a cd goat-book, or similar.
Alternatively, if you’re sure you’re in the right place, you may have run into a bug from an older version of Python, where it wouldn’t install an activate script that was compatible with Git-Bash. Reinstall Python 3, and make sure you have version 3.6.3 or later, and then delete and re-create your virtualenv.
If you see something like this, it’s probably the same issue, you need to upgrade Python:
bash: @echo: command not found
bash: .venv/Scripts/activate.bat: line 4:
      syntax error near unexpected token `(
bash: .venv/Scripts/activate.bat: line 4: `if not defined PROMPT ('
Final one! If you see this:
'source' is not recognized as an internal or external command,
operable program or batch file.
It’s because you’ve launched the default Windows command prompt, cmd,
instead of Git-Bash. Close it and open the latter.
Happy coding!
| Did these instructions not work for you? Or have you got better ones? Get in touch: [email protected]! |
Comments