
User Authentication, Spiking, and De-Spiking
Our beautiful lists site has been live for a few days, and our users are starting to come back to us with feedback. "We love the site", they say, "but we keep losing our lists. Manually remembering URLs is hard. It’d be great if it could remember what lists we’d started".
Remember Henry Ford and faster horses. Whenever you hear a user requirement, it’s important to dig a little deeper and think—what is the real requirement here? And how can I make it involve a cool new technology I’ve been wanting to try out?
Clearly the requirement here is that people want to have some kind of user account on the site. So, without further ado, let’s dive into authentication.
Naturally we’re not going to mess about with remembering passwords ourselves—besides being so '90s, secure storage of user passwords is a security nightmare we’d rather leave to someone else. We’ll use something fun called passwordless auth instead.
(If you insist on storing your own passwords, Django’s default auth module is ready and waiting for you. It’s nice and straightforward, and I’ll leave it to you to discover on your own.)
Passwordless Auth
What authentication system could we use to avoid storing passwords ourselves? Oauth? Openid? "Login with Facebook"? Ugh. For me those all have unacceptable creepy overtones; why should Google or Facebook know what sites you’re logging into and when?
In the first edition I used an experimental project called "Persona", cooked up by a some of the wonderful techno-hippy-idealists at Mozilla, but sadly that project was abandoned.
Instead I’ve found a fun approach to authentication that goes by the name of "Passwordless", but you might call it "just use email".
The system was invented by someone annoyed at having to create new passwords for so many websites, who found himself just using random, throwaway passwords, not even trying to remember them, and using the "forgot my password" feature whenever he needed to log in again. You can read all about it on Medium.
The concept is: just use email to verify someone’s identity. If you’re going to have a "forgot my password" feature, then you’re trusting email anyway, so why not just go the whole hog? Whenever someone wants to log in, we generate a unique URL for them to use, email it to them, and they then click through that to get into the site.
It’s by no means a perfect system, and in fact there are lots of subtleties to be thought through before it would really make a good login solution for a production website, but this is just a fun toy project so let’s give it a go.
Exploratory Coding, aka "Spiking"
Before I wrote this chapter all I knew about passwordless auth was the outline I’d read in the article linked above. I’d never seen any code for it, and didn’t really know where to start in building it.
In Chapters #chapter_13_database_layer_validation and #chapter_14_simple_form we saw that you can use a unit test as a way of exploring a new API or tool, but sometimes you just want to hack something together without any tests at all, just to see if it works, to learn it or get a feel for it. That’s absolutely fine. When learning a new tool or exploring a new possible solution, it’s often appropriate to leave the rigorous TDD process to one side, and build a little prototype without tests, or perhaps with very few tests. The goat doesn’t mind looking the other way for a bit.
This kind of prototyping activity is often called a "spike", for reasons best known.
The first thing I did was take a look at existing Python and Django authentication packages, like django-allauth and python-social-auth, but both of them looked overcomplicated for this stage (and besides, it’ll be more fun to code our own!).
So instead I dived in and hacked about, and after a few dead ends and wrong turns, I had something which just about works. I’ll take you on a tour, and then we’ll go through and "de-spike" the implementation—that is, replace the prototype with tested, production-ready code.
You should go ahead and add this code to your own site too, and then you can have a play with it, try logging in with your own email address, and convince yourself that it really does work.
Starting a Branch for the Spike
Before embarking on a spike, it’s a good idea to start a new branch, so you can still use your VCS without worrying about your spike commits getting mixed up with your production code:
$ git checkout -b passwordless-spike
Let’s keep track of some of the things we’re hoping to learn from the spike:
Frontend Log in UI
Let’s start with the frontend, hacking in an actual form to be able to enter your email address into the navbar, and a logout link for users who are already authenticated:
<body>
  <div class="container">

    <div class="navbar">
      {% if user.is_authenticated %}
        <p>Logged in as {{ user.email }}</p>
        <p><a id="id_logout" href="{% url 'logout' %}">Log out</a></p>
      {% else %}
        <form method="POST" action ="{% url 'send_login_email' %}">
          Enter email to log in: <input name="email" type="text" />
          {% csrf_token %}
        </form>
      {% endif %}
    </div>

    <div class="row">
    [...]
Sending Emails from Django
The login theory will be something like this:
-
When someone wants to log in, we generate a unique secret token for them, store it in the database linked to their email, and send it to them.
-
They then check their email, which will have a link to a URL that includes that token.
-
When they click that link, we check whether the token exists in database, and if so, they are logged in as the associated user.
First we prep an app for our accounts stuff:
$ python manage.py startapp accounts
And we’ll wire up urls.py with at least one URL. In the top-level superlists/urls.py…
from django.conf.urls import include, url
from lists import views as list_views
from lists import urls as list_urls
from accounts import urls as accounts_urls

urlpatterns = [
    url(r'^$', list_views.home_page, name='home'),
    url(r'^lists/', include(list_urls)),
    url(r'^accounts/', include(accounts_urls)),
]
And in the accounts module’s urls.py:
from django.conf.urls import url
from accounts import views

urlpatterns = [
    url(r'^send_email$', views.send_login_email, name='send_login_email'),
]
Here’s the view that’s in charge of creating a token associated with the email address the user puts in our login form:
import uuid
import sys
from django.shortcuts import render
from django.core.mail import send_mail

from accounts.models import Token


def send_login_email(request):
    email = request.POST['email']
    uid = str(uuid.uuid4())
    Token.objects.create(email=email, uid=uid)
    print('saving uid', uid, 'for email', email, file=sys.stderr)
    url = request.build_absolute_uri(f'/accounts/login?uid={uid}')
    send_mail(
        'Your login link for Superlists',
        f'Use this link to log in:\n\n{url}',
        'noreply@superlists',
        [email],
    )
    return render(request, 'login_email_sent.html')
For that to work we’ll need a placeholder message confirming the email was sent:
<html>
<h1>Email sent</h1>

<p>Check your email, you'll find a message with a link that will log you into
the site.</p>

</html>
(You can see how hacky this code is—we’d want to integrate this template with our base.html in the real version.)
More importantly, for the Django send_mail function to work, we need to tell
Django our email server address. I’m just using my
Gmail[1]
account for now. You can use any email provider you like, as long as they
support SMTP:
EMAIL_HOST = 'smtp.gmail.com'
EMAIL_HOST_USER = '[email protected]'
EMAIL_HOST_PASSWORD = os.environ.get('EMAIL_PASSWORD')
EMAIL_PORT = 587
EMAIL_USE_TLS = True| If you want to use Gmail as well, you’ll probably have to visit your Google account security settings page. If you’re using two-factor auth, you’ll want to set up an app-specific password. If you’re not, you will probably still need to allow access for less secure apps. You might want to consider creating a new Google account for this purpose, rather than using one containing sensitive data. |
Another Secret, Another Environment Variable
Once
again, we have a "secret" that we want to avoid keeping directly in
our source code or on GitHub, so another environment variable gets
used in the os.environ.get.
To get this to work, we need to set it in the shell that’s running my dev server:
$ export EMAIL_PASSWORD="sekrit"
Later we’ll see about adding that to the .env on the staging server as well.
Storing Tokens in the Database
How are we doing?
We’ll need a model to store our tokens in the database—they link an email address with a unique ID. Pretty simple:
from django.db import models

class Token(models.Model):
    email = models.EmailField()
    uid = models.CharField(max_length=255)
Custom Authentication Models
While we’re messing about with models, let’s start experimenting with authentication in Django.
The first thing we’ll need is a user model. When I first wrote this, custom user models were a new thing in Django, so I dived into the Django auth documentation and tried to hack in the simplest possible one:
[...]
from django.contrib.auth.models import (
    AbstractBaseUser, BaseUserManager, PermissionsMixin
)


class ListUser(AbstractBaseUser, PermissionsMixin):
    email = models.EmailField(primary_key=True)
    USERNAME_FIELD = 'email'
    #REQUIRED_FIELDS = ['email', 'height']

    objects = ListUserManager()

    @property
    def is_staff(self):
        return self.email == '[email protected]'

    @property
    def is_active(self):
        return True
That’s what I call a minimal user model! One field, none of this firstname/lastname/username nonsense, and, pointedly, no password! Somebody else’s problem!
But, again, you can see that this code isn’t ready for production, from the commented-out lines to the hardcoded harry email address. We’ll neaten this up quite a lot when we de-spike.
To get it to work, you need a model manager for the user:
[...]
class ListUserManager(BaseUserManager):

    def create_user(self, email):
        ListUser.objects.create(email=email)

    def create_superuser(self, email, password):
        self.create_user(email)
No need to worry about what a model manager is at this stage; for now we just need it because we need it, and it just works. When we de-spike, we’ll examine each bit of code that actually ends up in production and make sure we understand it fully.
Finishing the Custom Django Auth
Almost there—our last step combines recognising the token and then actually logging the user in. Once we’ve done this, we’ll be able to pretty much strike off all the items on our scratchpad:
So here’s the view that actually handles the click through from the link in the email:
import uuid
import sys
from django.contrib.auth import authenticate
from django.contrib.auth import login as auth_login
from django.core.mail import send_mail
from django.shortcuts import redirect, render
[...]

def login(request):
    print('login view', file=sys.stderr)
    uid = request.GET.get('uid')
    user = authenticate(uid=uid)
    if user is not None:
        auth_login(request, user)
    return redirect('/')
The "authenticate" function invokes Django’s authentication framework, which we configure using a "custom authentication backend", whose job it is to validate the UID and return a user with the right email.
We could have done this stuff directly in the view, but we may as well structure things the way Django expects. It makes for a reasonably neat separation of concerns:
import sys
from accounts.models import ListUser, Token

class PasswordlessAuthenticationBackend(object):

    def authenticate(self, uid):
        print('uid', uid, file=sys.stderr)
        if not Token.objects.filter(uid=uid).exists():
            print('no token found', file=sys.stderr)
            return None
        token = Token.objects.get(uid=uid)
        print('got token', file=sys.stderr)
        try:
            user = ListUser.objects.get(email=token.email)
            print('got user', file=sys.stderr)
            return user
        except ListUser.DoesNotExist:
            print('new user', file=sys.stderr)
            return ListUser.objects.create(email=token.email)


    def get_user(self, email):
        return ListUser.objects.get(email=email)
Again, lots of debug prints in there, and some duplicated code, not something we’d want in production, but it works…
Finally, a logout view:
from django.contrib.auth import login as auth_login, logout as auth_logout
[...]

def logout(request):
    auth_logout(request)
    return redirect('/')
Add login and logout to our urls.py…
from django.conf.urls import url
from accounts import views

urlpatterns = [
    url(r'^send_email$', views.send_login_email, name='send_login_email'),
    url(r'^login$', views.login, name='login'),
    url(r'^logout$', views.logout, name='logout'),
]
Almost there! We switch on the auth backend and our new accounts app in settings.py:
INSTALLED_APPS = [
    #'django.contrib.admin',
    'django.contrib.auth',
    'django.contrib.contenttypes',
    'django.contrib.sessions',
    'django.contrib.messages',
    'django.contrib.staticfiles',
    'lists',
    'accounts',
]

AUTH_USER_MODEL = 'accounts.ListUser'
AUTHENTICATION_BACKENDS = [
    'accounts.authentication.PasswordlessAuthenticationBackend',
]

MIDDLEWARE = [
[...]
A quick makemigrations to make the token and user models real:
$ python manage.py makemigrations
Migrations for 'accounts':
  accounts/migrations/0001_initial.py
    - Create model ListUser
    - Create model Token
And a migrate to build the database:
$ python manage.py migrate
[...]
Running migrations:
  Applying accounts.0001_initial... OK
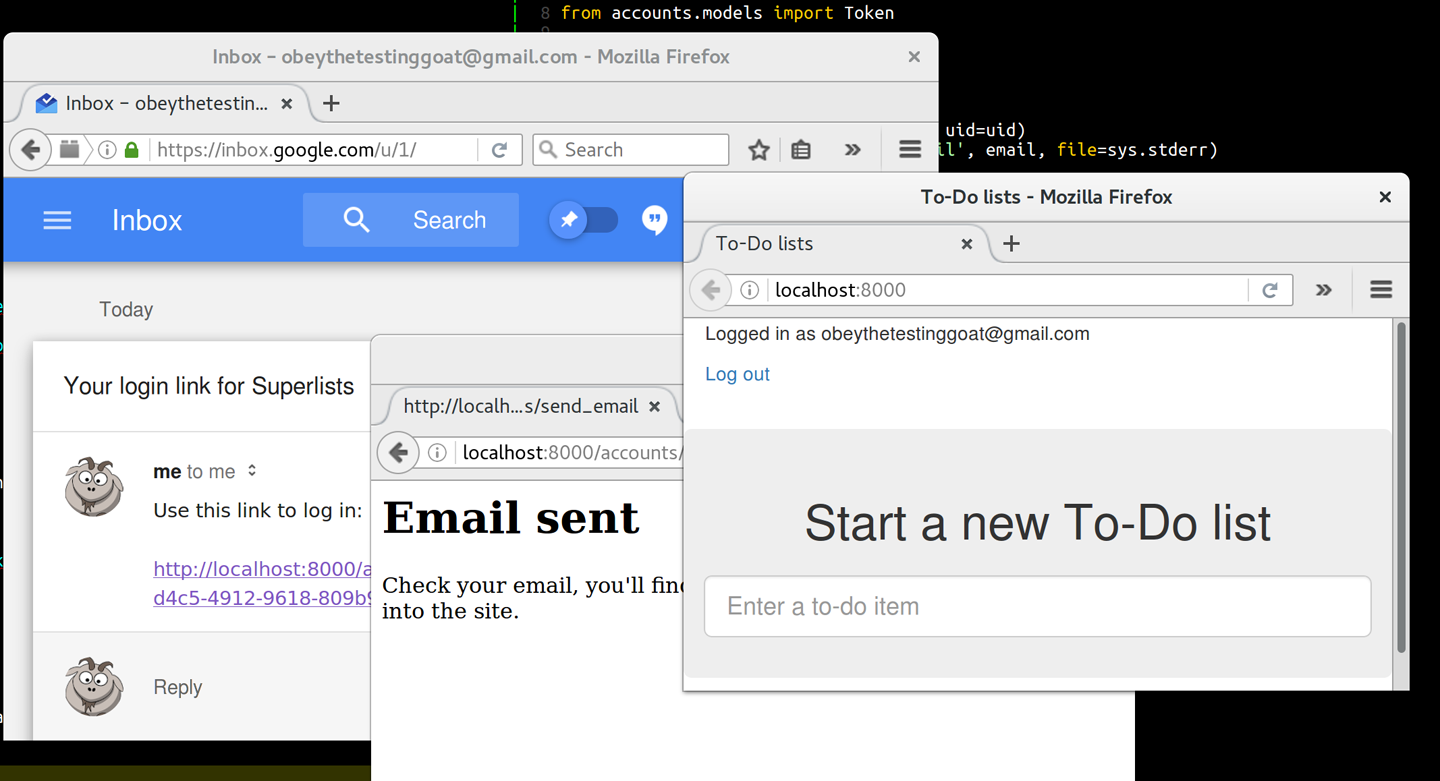
And we should be all done! Why not spin up a dev server with runserver and
see how it all looks (It works! It works! Mwahahahaha.)?
If you get an SMTPSenderRefused error message, don’t forget to set
the EMAIL_PASSWORD environment variable in the shell that’s running
runserver.
|
That’s pretty much it! Along the way, I had to fight pretty hard, including clicking around the Gmail account security UI for a while, stumbling over several missing attributes on my custom user model (because I didn’t read the docs properly), and even at one point switching to the dev version of Django to overcome a bug, which thankfully turned out to be irrelevant.
But we now have a working solution! Let’s commit it on our spike branch:
$ git status
$ git add accounts
$ git commit -am "spiked in custom passwordless auth backend"
Time to de-spike!
De-spiking
De-spiking means rewriting your prototype code using TDD. We now have enough information to "do it properly". So what’s the first step? An FT, of course!
We’ll stay on the spike branch for now, to see our FT pass against our spiked code. Then we’ll go back to master and commit just the FT.
Here’s a first, simple version of the FT:
from django.core import mail
from selenium.webdriver.common.keys import Keys
import re

from .base import FunctionalTest

TEST_EMAIL = '[email protected]'
SUBJECT = 'Your login link for Superlists'


class LoginTest(FunctionalTest):

    def test_can_get_email_link_to_log_in(self):
        # Edith goes to the awesome superlists site
        # and notices a "Log in" section in the navbar for the first time
        # It's telling her to enter her email address, so she does
        self.browser.get(self.live_server_url)
        self.browser.find_element_by_name('email').send_keys(TEST_EMAIL)
        self.browser.find_element_by_name('email').send_keys(Keys.ENTER)

        # A message appears telling her an email has been sent
        self.wait_for(lambda: self.assertIn(
            'Check your email',
            self.browser.find_element_by_tag_name('body').text
        ))

        # She checks her email and finds a message
        email = mail.outbox[0]  (1)
        self.assertIn(TEST_EMAIL, email.to)
        self.assertEqual(email.subject, SUBJECT)

        # It has a url link in it
        self.assertIn('Use this link to log in', email.body)
        url_search = re.search(r'http://.+/.+$', email.body)
        if not url_search:
            self.fail(f'Could not find url in email body:\n{email.body}')
        url = url_search.group(0)
        self.assertIn(self.live_server_url, url)

        # she clicks it
        self.browser.get(url)

        # she is logged in!
        self.wait_for(
            lambda: self.browser.find_element_by_link_text('Log out')
        )
        navbar = self.browser.find_element_by_css_selector('.navbar')
self.assertIn(TEST_EMAIL, navbar.text)| 1 | Were you worried about how we were going to handle retrieving emails in our
tests? Thankfully we can cheat for now! When running tests, Django gives
us access to any emails the server tries to send via the mail.outbox
attribute. We’ll save checking "real" emails for later (but we will do it!). |
And if we run the FT, it works!
$ python manage.py test functional_tests.test_login
[...]
Not Found: /favicon.ico
saving uid [...]
login view
uid [...]
got token
new user

.
 ---------------------------------------------------------------------
Ran 1 test in 3.729s

OK
You can even see some of the debug output I left in my spiked view implementations. Now it’s time to revert all of our temporary changes, and reintroduce them one by one in a test-driven way.
Reverting Our Spiked Code
$ git checkout master # switch back to master branch
$ rm -rf accounts # remove any trace of spiked code
$ git add functional_tests/test_login.py
$ git commit -m "FT for login via email"
Now we rerun the FT and let it drive our development:
$ python manage.py test functional_tests.test_login
selenium.common.exceptions.NoSuchElementException: Message: Unable to locate
element: [name="email"]
[...]
The first thing it wants us to do is add an email input element. Bootstrap has some built-in classes for navigation bars, so we’ll use them, and include a form for the login email:
<div class="container">

  <nav class="navbar navbar-default" role="navigation">
    <div class="container-fluid">
      <a class="navbar-brand" href="/">Superlists</a>
      <form class="navbar-form navbar-right" method="POST" action="#">
        <span>Enter email to log in:</span>
        <input class="form-control" name="email" type="text" />
        {% csrf_token %}
      </form>
    </div>
  </nav>

  <div class="row">
  [...]
Now our FT fails because the login form doesn’t actually do anything:
$ python manage.py test functional_tests.test_login
[...]
AssertionError: 'Check your email' not found in 'Superlists\nEnter email to log
in:\nStart a new To-Do list'
I recommend reintroducing the LOGGING setting from earlier at this
point. There’s no need for an explicit test for it; our current test
suite will let us know in the unlikely event that it breaks anything. As
we’ll find out in [chapter_server_side_debugging], it’ll be useful for
debugging later.
|
Time to start writing some Django code. We begin by creating an app called
accounts to hold all the files related to login:
$ python manage.py startapp accounts
You could even do a commit just for that, to be able to distinguish the placeholder app files from our modifications.
Next let’s rebuild our minimal user model, with tests this time, and see if it turns out neater than it did in the spike.
A Minimal Custom User Model
Django’s built-in user model makes all sorts of assumptions about what information you want to track about users, from explicitly recording first name and last name[2] to forcing you to use a username. I’m a great believer in not storing information about users unless you absolutely must, so a user model that records an email address and nothing else sounds good to me!
By now I’m sure you can manage to create the tests folder and its __init__.py, remove tests.py, and then add a test_models.py to say:
from django.test import TestCase
from django.contrib.auth import get_user_model

User = get_user_model()


class UserModelTest(TestCase):

    def test_user_is_valid_with_email_only(self):
        user = User(email='[email protected]')
        user.full_clean()  # should not raise
That gives us an expected failure:
django.core.exceptions.ValidationError: {'password': ['This field cannot be
blank.'], 'username': ['This field cannot be blank.']}
Password? Username? Bah! How about this?
from django.db import models

class User(models.Model):
    email = models.EmailField()
And we wire it up inside settings.py, adding accounts to INSTALLED_APPS
and a variable called AUTH_USER_MODEL:
INSTALLED_APPS = [
    #'django.contrib.admin',
    'django.contrib.auth',
    'django.contrib.contenttypes',
    'django.contrib.sessions',
    'django.contrib.messages',
    'django.contrib.staticfiles',
    'lists',
    'accounts',
]

AUTH_USER_MODEL = 'accounts.User'
The next error is a database error:
django.db.utils.OperationalError: no such table: accounts_user
That prompts us, as usual, to do a migration… When we try, Django complains that our custom user model is missing a couple of bits of metadata:
$ python manage.py makemigrations
Traceback (most recent call last):
[...]
    if not isinstance(cls.REQUIRED_FIELDS, (list, tuple)):
AttributeError: type object 'User' has no attribute 'REQUIRED_FIELDS'
Sigh. Come on, Django, it’s only got one field, so you should be able to figure out the answers to these questions for yourself. Here you go:
class User(models.Model):
    email = models.EmailField()
    REQUIRED_FIELDS = []
Next silly question?[3]
$ python manage.py makemigrations
[...]
AttributeError: type object 'User' has no attribute 'USERNAME_FIELD'
And we go through a few more of these, until we get to:
class User(models.Model):
    email = models.EmailField()

    REQUIRED_FIELDS = []
    USERNAME_FIELD = 'email'
    is_anonymous = False
    is_authenticated = True
And now we get a slightly different error:
$ python manage.py makemigrations
SystemCheckError: System check identified some issues:

ERRORS:
accounts.User: (auth.E003) 'User.email' must be unique because it is named as
the 'USERNAME_FIELD'.
Well, the simple way to fix that would be like this:
email = models.EmailField(unique=True)Now the migration is successful:
$ python manage.py makemigrations
Migrations for 'accounts':
  accounts/migrations/0001_initial.py
    - Create model User
And the test passes:
$ python manage.py test accounts
[...]
Ran 1 tests in 0.001s
OK
But our model isn’t quite as simple as it could be. It has the email field, and also an autogenerated "ID" field as its primary key. We could make it even simpler!
Tests as Documentation
Let’s
go all the way and make the email field into the primary
key,[4]
and thus implicitly remove the autogenerated id column.
Although we could just do it and our test would still pass, and conceivably claim it was "just a refactor", it would be better to have a specific test:
    def test_email_is_primary_key(self):
        user = User(email='[email protected]')
        self.assertEqual(user.pk, '[email protected]')
It’ll help us remember if we ever come back and look at the code again in future:
    self.assertEqual(user.pk, '[email protected]')
AssertionError: None != '[email protected]'
| Your tests can be a form of documentation for your code—they express what your requirements are of a particular class or function. Sometimes, if you forget why you’ve done something a particular way, going back and looking at the tests will give you the answer. That’s why it’s important to give your tests explicit, verbose method names. |
And here’s the implementation (feel free to check what happens with
unique=True first):
email = models.EmailField(primary_key=True)And we mustn’t forget to adjust our migrations:
$ rm accounts/migrations/0001_initial.py
$ python manage.py makemigrations
Migrations for 'accounts':
  accounts/migrations/0001_initial.py
    - Create model User
And both our tests pass:
$ python manage.py test accounts
[...]
Ran 2 tests in 0.001s
OK
A Token Model to Link Emails with a Unique ID
Next let’s build a token model. Here’s a short unit test that captures the essence—you should be able to link an email to a unique ID, and that ID shouldn’t be the same two times in a row:
from accounts.models import Token
[...]


class TokenModelTest(TestCase):

    def test_links_user_with_auto_generated_uid(self):
        token1 = Token.objects.create(email='[email protected]')
        token2 = Token.objects.create(email='[email protected]')
        self.assertNotEqual(token1.uid, token2.uid)
I won’t show every single listing for creating the Token class in models.py; I’ll let you do that yourself instead. Driving Django models with basic TDD involves jumping through a few hoops because of the migration, so you’ll see a few iterations like this—minimal code change, make migrations, get new error, delete migrations, re-create new migrations, another code change, and so on…
$ python manage.py makemigrations
Migrations for 'accounts':
  accounts/migrations/0002_token.py
    - Create model Token
$ python manage.py test accounts
[...]
TypeError: 'email' is an invalid keyword argument for this function
I’ll trust you to go through these conscientiously—remember, I may not be able to see you, but the Testing Goat can!
$ rm accounts/migrations/0002_token.py
$ python manage.py makemigrations
Migrations for 'accounts':
  accounts/migrations/0002_token.py
    - Create model Token
$ python manage.py test accounts
AttributeError: 'Token' object has no attribute 'uid'
Eventually you should get to this code…
class Token(models.Model):
    email = models.EmailField()
    uid = models.CharField(max_length=40)
And this error:
$ python manage.py test accounts
[...]

    self.assertNotEqual(token1.uid, token2.uid)
AssertionError: '' == ''
And here we have to decide how to generate our random unique ID field. We
could use the random module, but Python actually comes with another module
specifically designed for generating unique IDs called "uuid" (for "universally
unique id").
We can use that like this:
import uuid
[...]

class Token(models.Model):
    email = models.EmailField()
    uid = models.CharField(default=uuid.uuid4, max_length=40)
And, with a bit more wrangling of migrations, that should get us to passing tests:
$ python manage.py test accounts
[...]
Ran 3 tests in 0.015s

OK
Well, that gets us on our way! The models layer is done, at least. In the next chapter, we’ll get into mocking, a key technique for testing external dependencies like email.
Comments