
Dipping Our Toes, Very Tentatively, into JavaScript
If the Good Lord had wanted us to enjoy ourselves, he wouldn’t have granted us his precious gift of relentless misery.
Our new validation logic is good, but wouldn’t it be nice if the duplicate item error messages disappeared once the user started fixing the problem? Just like our nice HTML5 validation errors do? For that we’d need a teeny-tiny bit of JavaScript.
We are utterly spoiled by programming every day in such a joyful language as Python. JavaScript is our punishment. For a web developer though, there’s no way around it. So let’s dip our toes in, very gingerly.
| I’m going to assume you know the basics of JavaScript syntax. If you haven’t read JavaScript: The Good Parts, go and get yourself a copy right away! It’s not a very long book. |
Starting with an FT
Let’s
add a new functional test to the ItemValidationTest class:
def test_error_messages_are_cleared_on_input(self):
    # Edith starts a list and causes a validation error:
    self.browser.get(self.live_server_url)
    self.get_item_input_box().send_keys('Banter too thick')
    self.get_item_input_box().send_keys(Keys.ENTER)
    self.wait_for_row_in_list_table('1: Banter too thick')
    self.get_item_input_box().send_keys('Banter too thick')
    self.get_item_input_box().send_keys(Keys.ENTER)

    self.wait_for(lambda: self.assertTrue(  (1)
        self.browser.find_element_by_css_selector('.has-error').is_displayed()  (2)
    ))

    # She starts typing in the input box to clear the error
    self.get_item_input_box().send_keys('a')

    # She is pleased to see that the error message disappears
    self.wait_for(lambda: self.assertFalse(
        self.browser.find_element_by_css_selector('.has-error').is_displayed()  (2)
))| 1 | We use another of our wait_for invocations, this time with assertTrue. |
| 2 | is_displayed() tells you whether an element is visible or not. We
can’t just rely on checking whether the element is present in the DOM,
because now we’re starting to hide elements. |
That fails appropriately, but before we move on: three strikes and refactor! We’ve got several places where we find the error element using CSS. Let’s move it to a helper function:
class ItemValidationTest(FunctionalTest):

    def get_error_element(self):
        return self.browser.find_element_by_css_selector('.has-error')

[...]| I like to keep helper functions in the FT class that’s using them, and only promote them to the base class when they’re actually needed elsewhere. It stops the base class from getting too cluttered. YAGNI. |
And we then make three replacements in test_list_item_validation, like this:
    self.wait_for(lambda: self.assertEqual(
        self.get_error_element().text,
        "You've already got this in your list"
    ))
[...]
    self.wait_for(lambda: self.assertTrue(
        self.get_error_element().is_displayed()
    ))
[...]
    self.wait_for(lambda: self.assertFalse(
        self.get_error_element().is_displayed()
    ))
We have an expected failure:
$ python manage.py test functional_tests.test_list_item_validation
[...]
    self.get_error_element().is_displayed()
AssertionError: True is not false
And we can commit this as the first cut of our FT.
Setting Up a Basic JavaScript Test Runner
Choosing
your testing tools in the Python and Django world is fairly
straightforward. The standard library unittest package is perfectly
adequate, and the Django test runner also makes a good default choice.
There are some alternatives out there—nose
is popular, Green is the new kid on the
block, and I’ve personally found pytest to be very
impressive. But there is a clear default option, and it’s just
fine.[1]
Not so in the JavaScript world! We use YUI and Jest at work, but I thought I’d go out and see whether there were any new tools out there. I was overwhelmed with options—jsUnit, Qunit, Mocha, Chutzpah, Karma, Jasmine, and many more. And it doesn’t end there either: as I had almost settled on one of them, Mocha,[2] I find out that I now need to choose an assertion framework and a reporter, and maybe a mocking library, and it never ends!
In the end I decided we should use QUnit because it’s simple, has a similar look and feel to Python unit tests, and it works well with jQuery.
Make a directory called tests inside lists/static, and download the QUnit JavaScript and CSS files into it. We’ll also put a file called tests.html in there:
$ tree lists/static/tests/
lists/static/tests/
├── qunit-2.6.0.css
├── qunit-2.6.0.js
└── tests.html
The boilerplate for a QUnit HTML file looks like this, including a smoke test:
<!DOCTYPE html>
<html>
<head>
  <meta charset="utf-8">
  <meta name="viewport" content="width=device-width">
  <title>Javascript tests</title>
  <link rel="stylesheet" href="qunit-2.6.0.css">
</head>
<body>
  <div id="qunit"></div>
  <div id="qunit-fixture"></div>
  <script src="qunit-2.6.0.js"></script>

  <script>

QUnit.test("smoke test", function (assert) {
  assert.equal(1, 1, "Maths works!");
});

  </script>
</body>
</html>
Dissecting that, the important things to pick up are the fact that we pull
in qunit-2.6.0.js using the first <script> tag, and then use the second one
to write the main body of tests.
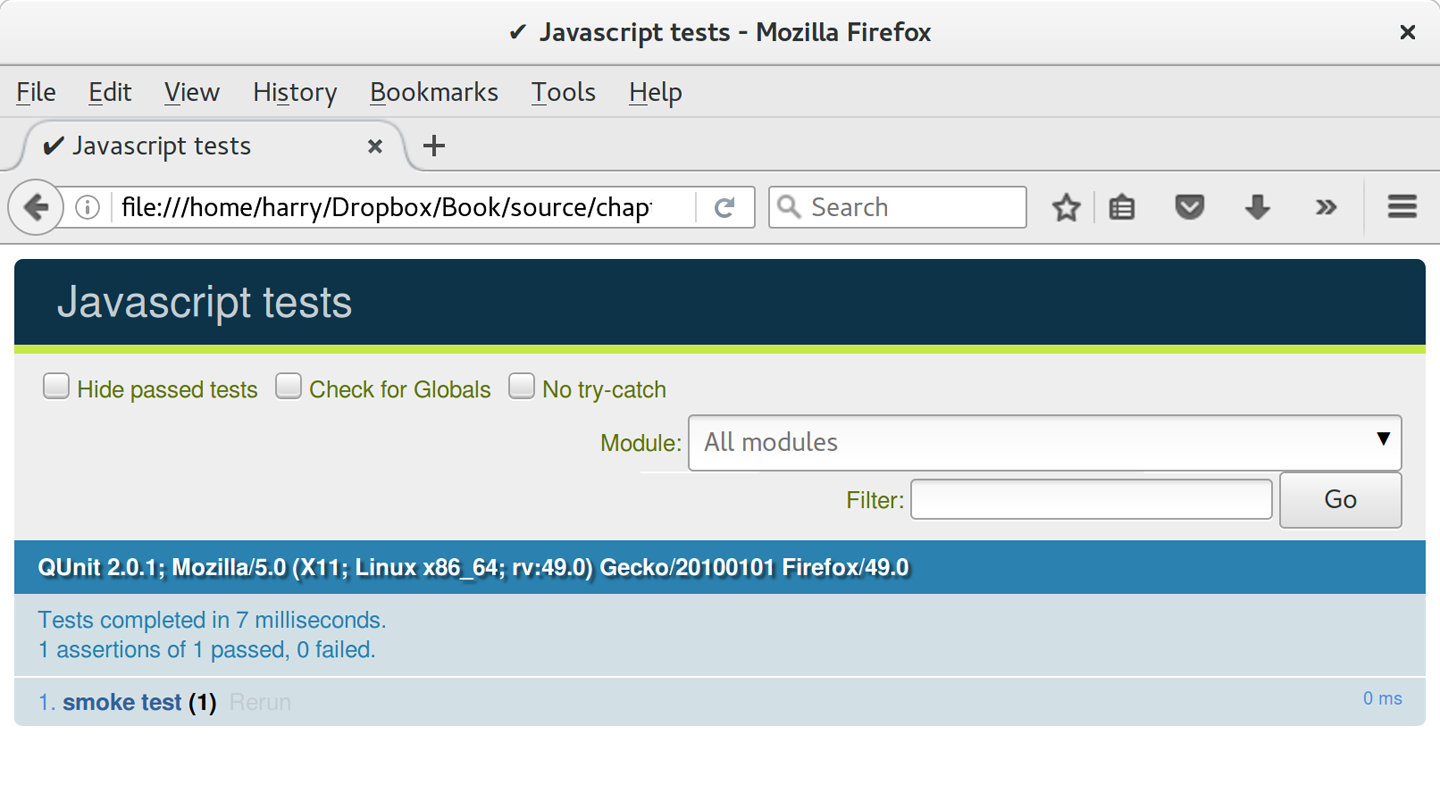
If you open up the file using your web browser (no need to run the dev server, just find the file on disk), you should see something like Basic QUnit screen.
Looking at the test itself, we’ll find many similarities with the Python tests we’ve been writing so far:
QUnit.test("smoke test", function (assert) { (1)
    assert.equal(1, 1, "Maths works!"); (2)
});| 1 | The QUnit.test function defines a test case, a bit like
def test_something(self) did in Python. Its first argument is a name for
the test, and the second is a function for the body of the test. |
| 2 | The assert.equal function is an assertion; very much like assertEqual,
it compares two arguments. Unlike in Python, though, the message is
displayed both for failures and for passes, so it should be phrased as a
positive rather than a negative. |
Why not try changing those arguments to see a deliberate failure?
Using jQuery and the Fixtures Div
Let’s get a bit more comfortable with what our testing framework can do, and start using a bit of jQuery—an almost indispensable library that gives you a cross-browser-compatible API for manipulating the DOM.
| If you’ve never seen jQuery before, I’m going to try to explain it as we go, just enough so that you won’t be totally lost; but this isn’t a jQuery tutorial. You may find it helpful to spend an hour or two investigating jQuery at some point during this chapter. |
Download the latest jQuery from jquery.com and save it into the lists/static folder.
Then let’s start using it in our tests file, along with adding a couple of HTML elements. We’ll start by seeing if we can show and hide an element, and write some assertions about its visibility:
  <div id="qunit-fixture"></div>

  <form>  (1)
    <input name="text" />
    <div class="has-error">Error text</div>
  </form>

  <script src="../jquery-3.3.1.min.js"></script> (2)
  <script src="qunit-2.6.0.js"></script>

  <script>

QUnit.test("smoke test", function (assert) {
  assert.equal($('.has-error').is(':visible'), true);  (3) (4)
  $('.has-error').hide();  (5)
  assert.equal($('.has-error').is(':visible'), false);  (6)
});

</script>| 1 | The <form> and its contents are there to represent what will be
on the real list page. |
| 2 | Here’s where we load jQuery. |
| 3 | jQuery magic starts here! $ is the jQuery Swiss Army knife. It’s
used to find bits of the DOM. Its first argument is a CSS selector; here,
we’re telling it to find all elements that have the class "has-error". It
returns an object that represents one or more DOM elements. That, in turn,
has various useful methods that allow us to manipulate or find out about
those elements. |
| 4 | One of which is .is, which can tell us whether an element matches a
particular CSS property. Here we use :visible to check whether the
element is displayed or hidden. |
| 5 | We then use jQuery’s .hide() method to hide the div. Behind the
scenes, it dynamically sets a style="display: none" on the element. |
| 6 | And finally we check that it’s worked, with a second assert.equal. |
If you refresh the browser, you should see that all passes:
2 assertions of 2 passed, 0 failed.
1. smoke test (2)
Time to see how fixtures work. Let’s just dupe up this test:
  <script>

QUnit.test("smoke test", function (assert) {
  assert.equal($('.has-error').is(':visible'), true);
  $('.has-error').hide();
  assert.equal($('.has-error').is(':visible'), false);
});
QUnit.test("smoke test 2", function (assert) {
  assert.equal($('.has-error').is(':visible'), true);
  $('.has-error').hide();
  assert.equal($('.has-error').is(':visible'), false);
});

  </script>
Slightly unexpectedly, we find one of them fails—see One of the two tests is failing.
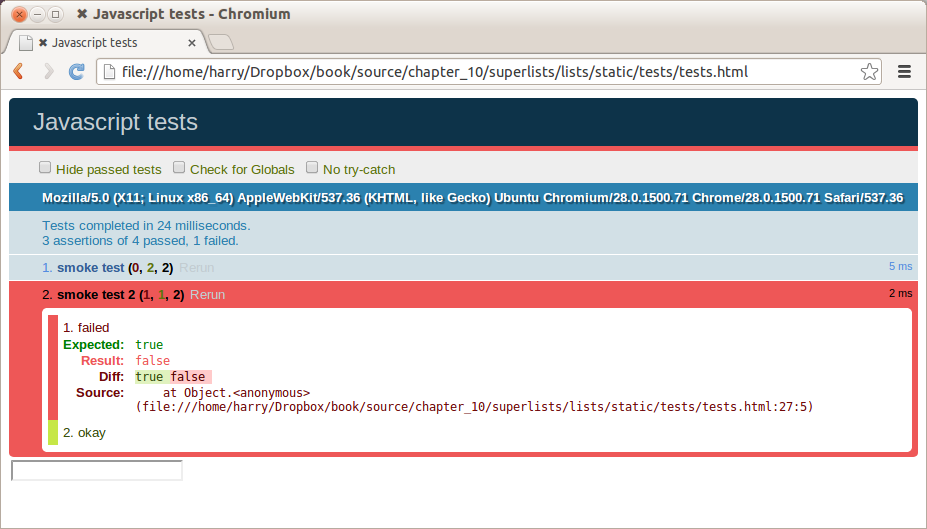
What’s happening here is that the first test hides the error div, so when the second test runs, it starts out invisible.
| QUnit tests do not run in a predictable order, so you can’t rely on the first test running before the second one. Try hitting refresh a few times, and you’ll find that the test which fails changes… |
We need some way of tidying up between tests, a bit like setUp and
tearDown, or like the Django test runner would reset the database between
each test. The qunit-fixture div is what we’re looking for. Move the form
in there:
  <div id="qunit"></div>
  <div id="qunit-fixture">
      <form>
          <input name="text" />
          <div class="has-error">Error text</div>
      </form>
  </div>

  <script src="../jquery-3.3.1.min.js"></script>
As you’ve probably guessed, jQuery resets the content of the fixtures div before each test, so that gets us back to two neatly passing tests:
4 assertions of 4 passed, 0 failed.
1. smoke test (2)
2. smoke test 2 (2)
Building a JavaScript Unit Test for Our Desired Functionality
Now that we’re acquainted with our JavaScript testing tools, we can switch back to just one test and start to write the real thing:
  <script>

QUnit.test("errors should be hidden on keypress", function (assert) {
  $('input[name="text"]').trigger('keypress'); (1)
  assert.equal($('.has-error').is(':visible'), false);
});

</script>| 1 | The jQuery .trigger method is mainly used for testing. It says "fire off
a JavScript DOM event on the element(s)". Here we use the keypress
event, which is fired off by the browser behind the scenes whenever a user
types something into a particular input element. |
| jQuery is hiding a lot of complexity behind the scenes here. Check out Quirksmode.org for a view on the hideous nest of differences between the different browsers' interpretation of events. The reason that jQuery is so popular is that it just makes all this stuff go away. |
And that gives us:
0 assertions of 1 passed, 1 failed.
1. errors should be hidden on keypress (1, 0, 1)
    1. failed
        Expected: false
        Result: true
Let’s say we want to keep our code in a standalone JavaScript file called list.js.
  <script src="../jquery-3.3.1.min.js"></script>
  <script src="../list.js"></script>
  <script src="qunit-2.6.0.js"></script>

  <script>
    [...]
Here’s the minimal code to get that test to pass:
$('.has-error').hide();And it works…
1 assertions of 1 passed, 0 failed.
1. errors should be hidden on keypress (1)
But it has an obvious problem. We’d better add another test:
QUnit.test("errors should be hidden on keypress", function (assert) {
  $('input[name="text"]').trigger('keypress');
  assert.equal($('.has-error').is(':visible'), false);
});

QUnit.test("errors aren't hidden if there is no keypress", function (assert) {
  assert.equal($('.has-error').is(':visible'), true);
});
Now we get an expected failure:
1 assertions of 2 passed, 1 failed.
1. errors should be hidden on keypress (1)
2. errors aren't hidden if there is no keypress (1, 0, 1)
    1. failed
        Expected: true
        Result: false
[...]
And we can make a more realistic implementation:
$('input[name="text"]').on('keypress', function () { (1)
  $('.has-error').hide();
});| 1 | This line says: find any input elements whose name attribute is "text", and
add an event listener which reacts on keypress events. The event
listener is the inline function, which hides all elements that have the
class .has-error. |
Does it work? No.
1 assertions of 2 passed, 1 failed.
1. errors should be hidden on keypress (1, 0, 1)
    1. failed
        Expected: false
        Result: true
[...]
2. errors aren't hidden if there is no keypress (1)
Curses! Why is that?
Fixtures, Execution Order, and Global State: Key Challenges of JS Testing
One of the difficulties with JavaScript in general, and testing in particular, is in understanding the order of execution of our code (i.e., what happens when). When does our code in list.js run, and when does each of our tests run? And how does that interact with global state, that is, the DOM of our web page, and the fixtures that we’ve already seen are supposed to be cleaned up after each test?
console.log for Debug Printing
Let’s add a couple of debug prints, or "console.logs":
  <script>

console.log('qunit tests start');

QUnit.test("errors should be hidden on keypress", function (assert) {
  console.log('in test 1');
  $('input[name="text"]').trigger('keypress');
  assert.equal($('.has-error').is(':visible'), false);
});

QUnit.test("errors aren't hidden if there is no keypress", function (assert) {
  console.log('in test 2');
  assert.equal($('.has-error').is(':visible'), true);
});
  </script>
And the same in our actual JS code:
$('input[name="text"]').on('keypress', function () {
  console.log('in keypress handler');
  $('.has-error').hide();
});
console.log('list.js loaded');
Rerun the tests, opening up the browser debug console (Ctrl-Shift-I usually) and you should see something like QUnit tests with console.log debug outputs.
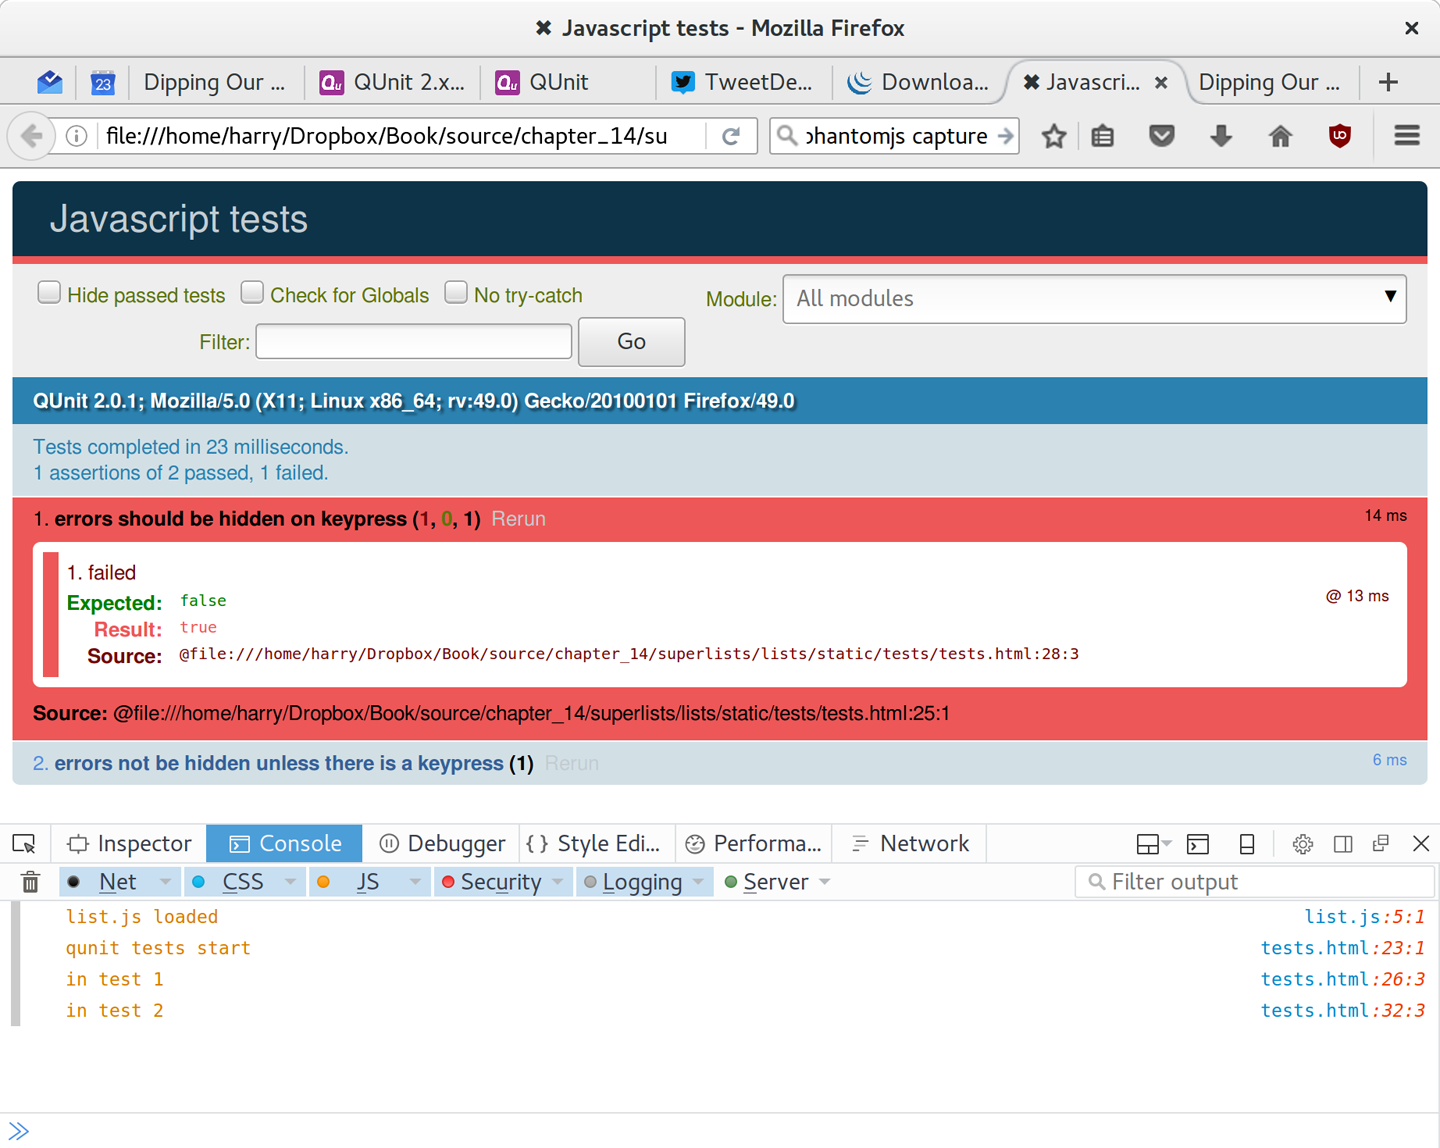
What do we see?
-
list.js loads first. So our event listener should be attached to the input element.
-
Then our QUnit tests file loads.
-
Then each test runs.
But, thinking it through, each test is going to "reset" the fixtures div, which means destroying and re-creating the input element. So the input element that list.js sees and attaches the event listener to will be replaced with a new one by the time each test runs.
Using an Initialize Function for More Control Over Execution Time
We need more control over the order of execution of our JavaScript. Rather
than just relying on the code in list.js running whenever it is loaded by
a <script> tag, we can use a common pattern, which is to define an
"initialize" function, and call that when we want to in our tests (and
later in real life):
var initialize = function () {
  console.log('initialize called');
  $('input[name="text"]').on('keypress', function () {
    console.log('in keypress handler');
    $('.has-error').hide();
  });
};
console.log('list.js loaded');
And in our tests file, we call initialize with each test:
QUnit.test("errors should be hidden on keypress", function (assert) {
  console.log('in test 1');
  initialize();
  $('input[name="text"]').trigger('keypress');
  assert.equal($('.has-error').is(':visible'), false);
});

QUnit.test("errors aren't hidden if there is no keypress", function (assert) {
  console.log('in test 2');
  initialize();
  assert.equal($('.has-error').is(':visible'), true);
});
Now we should see our tests pass, and our debug output should make more sense:
2 assertions of 2 passed, 0 failed.
1. errors should be hidden on keypress (1)
2. errors aren't hidden if there is no keypress (1)

list.js loaded
qunit tests start
in test 1
initialize called
in keypress handler
in test 2
initialize called
Hooray! Let’s strip out those console.logs:
var initialize = function () {
  $('input[name="text"]').on('keypress', function () {
    $('.has-error').hide();
  });
};
And from the tests too…
QUnit.test("errors should be hidden on keypress", function (assert) {
  initialize();
  $('input[name="text"]').trigger('keypress');
  assert.equal($('.has-error').is(':visible'), false);
});

QUnit.test("errors aren't hidden if there is no keypress", function (assert) {
  initialize();
  assert.equal($('.has-error').is(':visible'), true);
});
And for the moment of truth, we’ll pull in jQuery, our script, and invoke our initialize function on our real pages:
    </div>
    <script src="/static/jquery-3.3.1.min.js"></script>
    <script src="/static/list.js"></script>

    <script>
      initialize();
    </script>

  </body>
</html>| It’s good practice to put your script loads at the end of your body HTML, as it means the user doesn’t have to wait for all your JavaScript to load before they can see something on the page. It also helps to make sure most of the DOM has loaded before any scripts run. |
Aaaand we run our FT:
$ python manage.py test functional_tests.test_list_item_validation.\
ItemValidationTest.test_error_messages_are_cleared_on_input
[...]

Ran 1 test in 3.023s

OK
Hooray! That’s a commit!
$ git add lists/static
$ git commit -m"add jquery, qunit tests, list.js with keypress listeners"
Columbo Says: Onload Boilerplate and Namespacing
Oh, and one more thing. Our
initialize function name is too generic—what
if we include some third-party JavaScript tool later that also defines a
function called initialize? Let’s give ourselves a "namespace" that’s
unlikely to be used by anyone else:
window.Superlists = {}; (1)
window.Superlists.initialize = function () { (2)
  $('input[name="text"]').on('keypress', function () {
    $('.has-error').hide();
  });
};| 1 | We explicitly declare an object as a property of the "window" global, giving it a name that we think no one else is likely to use. |
| 2 | Then we make our initialize function an attribute of that namespace
object. |
| There are lots of other, much cleverer ways of dealing with namespaces in JavaScript, but they are all more complicated, and I’m not enough of an expert to be able to steer you around them. If you do want to learn more, search for require.js, which seemed to be the done thing, or at least it was in the last JavaScript femtosecond. |
  <script>
QUnit.test("errors should be hidden on keypress", function (assert) {
  window.Superlists.initialize();
  $('input[name="text"]').trigger('keypress');
  assert.equal($('.has-error').is(':visible'), false);
});

QUnit.test("errors aren't hidden if there is no keypress", function (assert) {
  window.Superlists.initialize();
  assert.equal($('.has-error').is(':visible'), true);
});
  </script>
Finally, whenever you have some JavaScript that interacts with the DOM, it’s
always good to wrap it in some "onload" boilerplate code to make sure that the
page has fully loaded before it tries to do anything. Currently it works
anyway, because we’ve placed the <script> tag right at the bottom of the
page, but we shouldn’t rely on that.
The jQuery onload boilerplate is quite minimal:
    <script>

$(document).ready(function () {
  window.Superlists.initialize();
});

    </script>
Read more in the jQuery .ready() docs.
JavaScript Testing in the TDD Cycle
You may be wondering how these JavaScript tests fit in with our "double loop" TDD cycle. The answer is that they play exactly the same role as our Python unit tests.
-
Write an FT and see it fail.
-
Figure out what kind of code you need next: Python or JavaScript?
-
Write a unit test in either language, and see it fail.
-
Write some code in either language, and make the test pass.
-
Rinse and repeat.
| Want a little more practice with JavaScript? See if you can get our error messages to be hidden when the user clicks inside the input element, as well as just when they type in it. You should be able to FT it too. |
We’re almost ready to move on to [part3]. The last step is to deploy our new code to our servers. Don’t forget to do a final commit including base.html first!
A Few Things That Didn’t Make It
In this chapter I wanted to cover the very basics of JavaScript testing and how it fits into our TDD workflow in this chapter. Here are a few pointers for further research:
-
At the moment, our test only checks that the JavaScript works on one page. It works because we’re including it in base.html, but if we’d only added it to home.html the tests would still pass. It’s a judgement call, but you could choose to write an extra test here.
-
When writing JavaScript, get as much help from your editor as you can to avoid common "gotchas". Check out syntax/error-checking tools like "jslint" and "jshint", also known as "linters".
-
QUnit mainly expects you to "run" your tests using an actual web browser. This has the advantage that it’s easy to create some HTML fixtures that match the kind of HTML your site actually contains, for tests to run against. But it’s also possible to run JS tests from the command line. We’ll see an example in [chapter_CI].
-
The new shiny thing in the world of frontend development are MVC frameworks like angular.js and React. Most tutorials for these use an RSpec-like assertion library called Jasmine. If you’re going to use one of them, you’ll probably find life easier if you use Jasmine rather than QUnit.
There is more JavaScript fun in this book too! Have a look at the Rest API appendix when you’re ready for it.
Comments